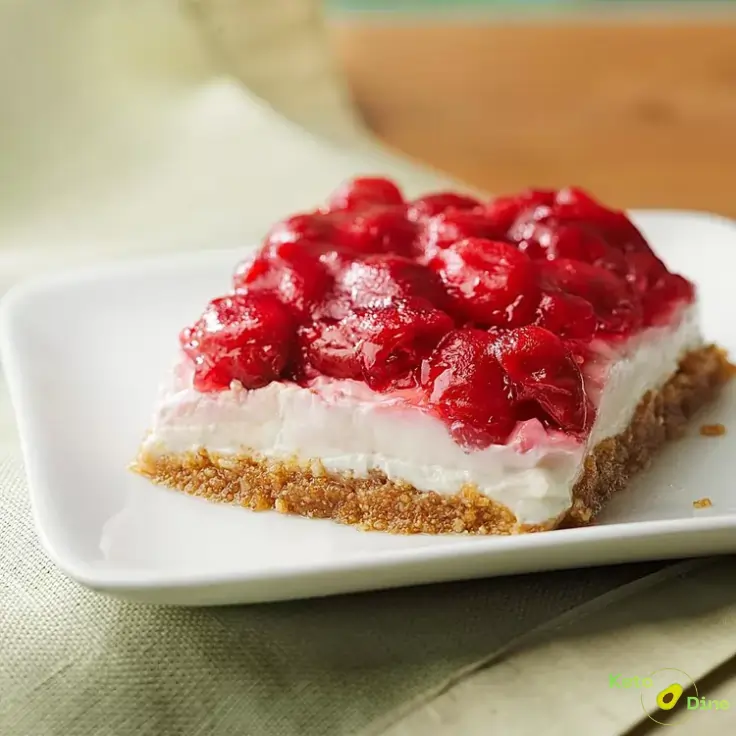
This creamy no-bake cherry cheesecake delivers all the decadent flavors of a traditional bakery dessert without any of the oven heat. You will love the velvety, smooth cream cheese layer paired with a buttery, crisp low-carb crust. Every bite offers a perfect balance of rich, sweet vanilla filling and a vibrant, tangy tart cherry topping. Consequently, it is a spectacular option when you want to impress guests or satisfy a serious sweet tooth. Additionally, this recipe utilizes low-carb ingredients to keep your healthy lifestyle on track while feeling completely indulgent.
Recipe Highlights
- Incredibly easy to prep with absolutely zero baking required.
- Velvety smooth filling that sets up beautifully in the refrigerator.
- Low-carb and sugar-free so everyone can enjoy a slice guilt-free.
- Perfectly balanced flavors ranging from buttery rich to fruit-forward tartness.
Why Make My No-Bake Cherry Cheesecake
- Ready quickly because the simple prep takes just twenty minutes before chilling.
- Great for meal prep since it keeps beautifully in the fridge for days.
- Beginner friendly with straightforward steps that anyone can easily master.
- No fancy equipment required beyond a standard hand mixer and a springform pan.
- Budget friendly ingredients ensure you do not break the bank for dessert.
- Family approved flavor means even your non-keto friends will devour every crumb.
Does No-Bake Cherry Cheesecake Fit a Keto Lifestyle?
This special recipe fits into a keto lifestyle seamlessly. Instead of using high-carb graham crackers, we create a crust using almond flour and sugar-free sweetener. The luxurious filling relies on full-fat cream cheese and heavy cream, which naturally provide excellent healthy fats. Furthermore, we use a custom sugar-free cherry topping to keep the net carbs remarkably low. Therefore, you can easily enjoy this classic comfort dessert without spiking your blood sugar.
Why I Make This No-Bake Cherry Cheesecake on Repeat
I make this dessert constantly because it satisfies my cravings instantly. It saves me during hot summer days when turning on the oven feels impossible. Meanwhile, the rich texture leaves me feeling completely satisfied after just a few bites. I love having a low-carb treat ready to slice whenever company stops by unexpectedly. It simply makes healthy eating feel like a daily celebration.
Why This Recipe is Special
- Keto-friendly profile allows you to stay in ketosis effortlessly.
- Quick preparation minimizes your time spent working in the kitchen.
- Comforting dessert appeal recreates nostalgic childhood holiday gatherings.
- Meal-prep friendly structure allows you to make it a full day ahead.
- Beginner friendly outline guarantees success even for novice home cooks.
My Personal Experience
- I discovered that whipping the heavy cream to stiff peaks before folding it into the cheese creates an incredibly airy texture.
- My family could not tell this was sugar-free because the powdered sweetener blends seamlessly without any cooling aftertaste.
Perfect For
- Weeknights when you want a sweet reward after a long workday.
- Meal prep to secure your healthy desserts for the upcoming week.
- Holidays because it adds a gorgeous pop of red to the dessert table.
- Parties since it slices cleanly and serves a crowd beautifully.
- Lunches as a decadent mid-day treat alongside your favorite coffee.
Why You'll Love This Recipe
- Zero oven heat means your kitchen stays completely cool and comfortable while making dessert.
- Luxurious texture delivers that signature dense, silky mouthfeel you expect from top-tier bakeries.
Variations You Can Try
- Extra zesty: Add fresh lemon zest into the cream cheese mixture for a bright citrus pop.
- Dairy-free alternative: Substitute coconut cream and vegan cream cheese to accommodate lactose sensitivities.
- Chocolate cherry blast: Incorporate sugar-free cocoa powder into the almond flour crust for a decadent twist.
- Nut-free option: Use crushed sunflower seed flour instead of almond flour to keep it allergen-safe.
- Individual jars: Layer the ingredients into small mason jars for perfect portion control and easy travel.
- Berry medley twist: Swap the cherries for a mix of sugar-free raspberries and blackberries to lower carbs further.
Key Ingredients
I’ve included everything below to make this recipe easy to follow at home. For the full printable recipe instructions and ingredient quantities, scroll to the Recipe card at the bottom of this post.
- Cream Cheese: Provides the rich, tangy foundation for our velvety filling while adding smooth structure.
- Almond Flour: Creates a dense, buttery crust that mimics graham crackers without the grain carbs.
- Heavy Whipping Cream: Introduces necessary aeration and lightness to make the cheesecake filling delightfully fluffy.
- Powdered Sweetener: Dissolves completely into the fats ensuring a silky texture without any unwanted graininess.
- Tart Cherries: Deliver a vibrant color and sharp, fruity contrast to the rich cream layers.
- Xanthan Gum: Acts as a thickener for the homemade cherry syrup to mimic traditional pie filling.
Ingredients & Substitutions
- Almond Flour: This forms the gluten-free base of our crust. You can substitute pecan flour or walnut flour for a deeper, nuttier flavor profile. Do not substitute with coconut flour as it absorbs too much moisture.
- Cream Cheese: Standard block cream cheese ensures the filling sets up firmly. You can use mascarpone cheese instead for an even richer, Italian-inspired flair. Do not use spreadable tub cream cheese.
- Powdered Sweetener: We use erythritol or monk fruit blends to keep it sugar-free. Powdered allulose works excellently as well. Avoid liquid sweeteners here as they can make the filling too runny.
- Heavy Whipping Cream: This adds volume to the cheesecake layer. Coconut cream can substitute if you want a subtle tropical undertone.
- Fresh or Frozen Tart Cherries: These create the gorgeous top layer. You can substitute strawberries or blueberries if cherries are unavailable.
How to Make No-Bake Cherry Cheesecake
I’ve included everything below to make this recipe easy to follow at home. For the full printable recipe instructions and ingredient quantities, scroll to the Recipe card at the bottom of this post.
- Mix the almond flour, melted butter, and a pinch of sweetener together until it resembles wet sand.
- Press the mixture firmly into the bottom of a seven-inch springform pan using a flat glass cup.
- Chill the crust in the freezer for ten minutes until it sets completely solid.
- Whip the cold heavy cream in a medium bowl until it forms stiff, stable peaks.
- Beat the softened cream cheese, vanilla, and powdered sweetener in a separate large bowl until smooth.
- Fold the whipped cream gently into the cream cheese mixture until no streaks remain.
- Spread the filling evenly over the chilled crust using an offset spatula for a flat surface.
- Simmer the cherries with water and sweetener in a saucepan for eight minutes until soft.
- Whisk in a pinch of xanthan gum and cool the sauce completely until it thickens into a glossy glaze.
- Pour the cooled cherry topping over the cheesecake layer before chilling the dessert.
- Refrigerate the completed cheesecake for at least four hours until it is thoroughly firm.
Pro Tip: Always ensure your cream cheese is completely at room temperature before beating, which prevents stubborn lumps from ruining your silky filling.
Common Mistakes to Avoid
- Using warm cherry topping will instantly melt the cream cheese layer and cause the colors to bleed.
- Rushing the chilling time results in a messy, soft cheesecake that collapses when you slice it.
- Buying liquid cream cheese introduces too much moisture, preventing the dessert from holding its shape properly.
Required Equipment
- Springform Pan: Allows you to release the delicate cheesecake sides cleanly without damaging the crust.
- Hand Mixer: Incorporates air into the heavy cream quickly and whips the cheese effortlessly.
- Offset Spatula: Helps smooth the filling into an even, professional layer across the base.
Caleb's Recipe Tips
- Toast the almond flour lightly in a dry skillet before making the crust to enhance the nutty aroma.
- Wipe your knife clean between every single slice to ensure beautiful, bakery-style presentation.
- Add a splash of almond extract to the cherry mixture to deepen the authentic stone-fruit flavor.
- Use a warm towel wrapped around the outside of the springform pan to ensure a flawless release.
Pro Tips for Best Results
- Select full-fat block cream cheese rather than light options to guarantee the proper firm set.
- Sift your powdered sweetener before mixing to eliminate any small clumps that resist blending.
- Keep your heavy cream ice cold right until the moment you whip it to maximize volume.
- Press the crust extra hard around the edges of the pan to prevent crumbling later.
- Allow the cherry topping to chill in the fridge separately before adding it to the cheesecake.
- Slice using a warm, wet blade to slide through the dense cheese layer effortlessly.
Storage Instructions
- Refrigerator storage: Keep the cheesecake inside the springform pan or an airtight dome container for up to five days.
- Freezer storage: Freeze individual slices on a parchment-lined tray before wrapping tightly in plastic wrap for up to three months.
- Containers: Use deep, sturdy airtight plastic containers to protect the delicate cherry topping from absorbing fridge odors.
- Thawing tips: Thaw frozen slices in the refrigerator for two hours before serving to maintain the ideal velvety texture.
Serving Ideas
- Fresh Mint Garnish: Place a small sprig of mint on top for a vibrant color contrast.
- Sugar-Free Dark Chocolate Shavings: Sprinkle chocolate over the cherries for a black forest inspired look.
- Iced Vanilla Coffee: Serve a chilled slice alongside a sugar-free iced latte during afternoon breaks.
- Holiday Dessert Platters: Arrange small square bars on a platter for easy party grazing.
- Extra Whipped Cream dollops: Pipe star drops of cream around the border for an elegant finish.