
 View Gallery
1 photo
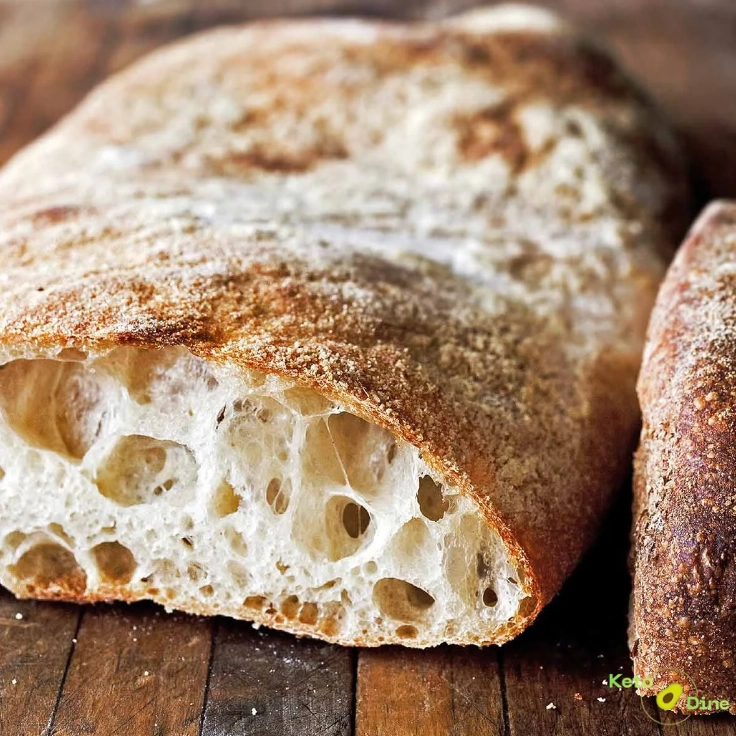
Baking a golden, crisp loaf of bread at home brings pure joy. This classic Italian artisan bread features a deeply golden, crackly crust and an airy, open crumb structure full of beautiful air pockets.
Each bite delivers a mild, savory yeast flavor with a delightfully soft center. Additionally, the satisfying crunch of the outer crust makes it ideal for sandwiches or dipping in extra virgin olive oil. Readers will absolutely love this simple, foolproof approach to baking authentic bakery-style bread right in their own kitchen.
Recipe Highlights:
This recipe relies on a high-hydration dough technique that creates that signature open, holey crumb structure. Furthermore, using a long fermentation process develops complex, authentic flavor with minimal active effort. As a result, you get a bakery-quality loaf with incredible texture using basic pantry staples.
Why Make My Homemade Ciabatta Bread
- Beginner friendly: Simple step-by-step folding techniques eliminate the need for complicated kneading tools.
- Budget friendly: Made using just four basic pantry ingredients that cost pennies per loaf.
- No fancy equipment: You do not need a stand mixer or specialized baking pans to achieve great results.
- Family approved: Perfect for feeding a crowd with hearty sandwiches or side garlic bread.
- Great for meal prep: Keeps extremely well and freezes beautifully for effortless weeknight meals.
- Ready quickly: Active hands-on time remains minimal while the dough naturally does all the hard work.
Does Homemade Ciabatta Bread Fit a Keto Lifestyle?
Traditional Ciabatta bread uses high-gluten bread flour, making it rich in carbohydrates. Consequently, a standard slice contains roughly 25 to 30 grams of total carbohydrates. Therefore, classic Ciabatta does not fit a strict keto or low-carb lifestyle. However, baking enthusiasts can easily swap traditional flour for vital wheat gluten and almond flour blends to drastically lower net carbs.
Why I Make This Homemade Ciabatta Bread on Repeat
Baking fresh artisan loaves fills the entire house with an irresistible, warm aroma. Additionally, the process is incredibly therapeutic and surprisingly easy once you master simple stretch-and-folds. Meanwhile, the versatile loaves pair seamlessly with warm soups, fresh salads, or hearty dinner spreads. Ultimately, achieving that golden, crackly crust at home yields unmatched satisfaction every single time.
Why These Homemade Ciabatta Loaves Are Special
- Airy crumb texture: High hydration creates gorgeous, dramatic air pockets inside every single slice.
- Crackly crust: High-heat baking yields a crisp, golden-brown outer shell.
- Simple ingredients: Requires only flour, water, yeast, and sea salt.
- Comforting vibe: Delivers authentic Italian bakery comfort directly from your home oven.
- Meal-prep friendly: Slices freeze incredibly well for quick daily toast or sandwiches.
My Personal Experience
- Simple stretch-and-folds replace vigorous kneading, keeping the preparation completely effortless and stress-free.
- High-temperature baking produces a delightful, crackly crust that sounds amazing when sliced.
- Long fermentation allows rich, complex yeast flavors to develop naturally overnight in your refrigerator.
- Dusting generously with flour protects the sticky, high-hydration dough during gentle shaping.
Perfect For
- Weeknights: Serve fresh slices alongside quick pasta dishes or hearty vegetable soups.
- Lunches: Slice horizontally to create world-class gourmet panini and pressed sandwiches.
- Parties: Arrange sliced bread on appetizer boards alongside extra virgin olive oil and balsamic vinegar.
- Family dinners: Impress your guests with warm, oven-fresh bread right at the dinner table.
- Holidays: Complement elaborate festive feasts with rustic, homemade artisan loaves.
Why You’ll Love This Recipe:
- Rustic artisan appearance: Looks like it came straight from a charming European bakery display.
- Minimal active labor: Dough folds take just seconds between relaxed resting intervals.
- Incredible versatility: Slices effortlessly for paninis, crostini, bruschetta, or plain garlic bread toast.
- Foolproof results: Clear visual indicators ensure great success even for first-time bread bakers.
Key Ingredients:
I’ve included everything below to make this recipe easy to follow at home. For the full printable recipe instructions and ingredient quantities, scroll to the Recipe card at the bottom of this post.
Bread Flour. High-protein flour provides essential gluten structure. Consequently, it creates those large signature air pockets and a delightfully chewy interior.
Active Dry Yeast. Quality yeast provides rapid rise and traditional bakery flavor. Furthermore, it generates the gas needed for light, airy loaves.
Fine Sea Salt. Salt strengthens the gluten network while balancing yeast growth. Additionally, it enhances the savory wheat flavor throughout the dough.
Warm Water. Pure water hydrates the flour to form a sticky, pliable dough. Meanwhile, proper water temperature activates the yeast effectively.
How to Make Homemade Ciabatta Bread
I’ve included everything below to make this recipe easy to follow at home. For the full printable recipe instructions and ingredient quantities, scroll to the Recipe card at the bottom of this post.
- Whisk warm water and active yeast together in a mixing bowl for 5 minutes until frothy.
- Add bread flour and fine sea salt to form a wet, shaggy dough without dry pockets.
- Cover the bowl securely and rest the dough at room temperature for 45 minutes to hydrate.
- Perform four gentle stretch-and-fold sets every 30 minutes until the dough becomes elastic and smooth.
- Cover and ferment the dough for 2 hours until doubled in volume with visible surface bubbles.
- Transfer dough carefully onto a generously floured work surface without deflating air pockets.
- Divide dough gently into two oblong loaf shapes using a bench scraper.
- Transfer shaped loaves onto parchment paper, cover loosely, and proof for 45 minutes until puffy.
- Preheat your oven with a baking stone or sheet to 425°F (220°C) for 30 minutes.
- Slide parchment paper with loaves onto the hot baking surface immediately.
- Bake for 22 to 25 minutes at 425°F (220°C) until deep golden brown and hollow-sounding when tapped.
Pro Tip: Place a cast-iron skillet on the bottom oven rack during preheating. Next, toss half a cup of ice cubes into the skillet right after loading your loaves. As a result, the trapped steam produces an extraordinarily crisp, crackly crust.
Common Mistakes to Avoid:
- Over-handling the dough: Deflating the delicate gas bubbles destroys the signature airy, open crumb structure.
- Using cold water: Cold temperatures slow down yeast activation and significantly extend rising times.
- Skipping the flour dusting: Handling wet, high-hydration dough without adequate flour leads to sticky messes.
- Cutting warm bread: Slicing immediately traps steam, turning the interior gummy instead of light and airy.
Required Equipment:
- Large glass mixing bowl — allows easy monitoring of dough expansion and bubble development.
- Bench scraper — handles wet, high-hydration dough cleanly without tearing delicate gluten strands.
- Baking parchment paper — prevents sticking while enabling seamless transfer into the hot oven.
- Heavy baking sheet — retains high heat to deliver maximum oven spring and crisp bottom crusts.
Caleb’s Recipe Tips
- Wet your hands lightly with water before performing folds to keep high-hydration dough from sticking.
- Allow the baked loaves to cool completely on a wire rack for at least 1 hour before slicing.
- Dust your kitchen towel with flour during the final proofing step to prevent surface tearing.
- Use a sharp serrated bread knife to slice smoothly through the crispy crust without crushing the loaf.
- Store cut loaves cut-side down on a wooden cutting board to maintain crust crispness naturally.
Storage Instructions
Keep leftover bread in a paper bag at room temperature for up to 3 days. Avoid plastic bags because they soften the crispy crust. Alternatively, wrap sliced bread tightly in foil and freeze for up to 3 months. Reheat frozen slices directly in a warm oven at 350°F (175°C) for 8 minutes to restore crispness.
Homemade Ciabatta Bread Recipe
Description
Master authentic artisan bread baking at home with this simple, step-by-step Ciabatta recipe. High hydration and gentle folding techniques create the signature holey interior and golden outer shell. Impress your family with fresh, warm bakery-style bread straight from your oven.
Ingredients
Instructions
- Combine warm water and active yeast in a large bowl, resting 5 minutes until frothy.
- Stir in bread flour and sea salt using a spatula until a wet, shaggy dough forms.
- Cover the dough tightly and rest at room temperature for 45 minutes to hydrate fully.
- Perform four stretch-and-folds every 30 minutes, grabbing dough edges and pulling upward gently.
- Cover and ferment for 2 hours until the dough doubles and displays large, airy surface bubbles.
- Turn dough out onto a generously floured counter, taking care not to crush delicate air pockets.
- Divide dough carefully into two rectangular loaves using a floured bench scraper.
- Transfer shaped loaves onto parchment paper and proof uncovered for 45 minutes until visibly puffy.
- Preheat oven containing a baking sheet to 425°F (220°C) for at least 30 minutes.
- Slide parchment paper with loaves onto the heated baking sheet inside the oven.
- Bake at 425°F (220°C) for 22–25 minutes until golden brown with a hollow sound when tapped.
- Cool loaves completely on a wire rack before slicing to avoid gummy internal texture.
Nutrition Facts
Servings: 10 ServingCalories:165kcalTotal Fat:0.5gSodium:350mgPotassium:65mgTotal Carbohydrate:22gDietary Fiber: 1.5gSugars: 0.5gProtein:6gCalcium: 12mg
Note
Store leftover loaves at room temperature in paper bags to maintain crust integrity. Reheat individual slices in a 350°F (175°C) oven or toaster to restore signature crispness. Additionally, freeze sliced loaves in airtight freezer bags for up to three months. Avoid refrigerating bread because cold environments accelerate starch crystallization and cause staling.
Pin this recipe to share with your friends and followers.

Frequently Asked Questions
Why is my Ciabatta dough so wet and sticky?
High hydration creates the signature open, airy crumb structure that defines authentic Ciabatta bread.
Can I use all-purpose flour instead of bread flour?
All-purpose flour works, but bread flour provides higher protein for better chewy texture and lift.
How do I know when the bread is fully baked?
Tap the bottom of the loaf gently; a clear, hollow sound indicates it is fully cooked.