
 View Gallery
1 photo
View Gallery
1 photo
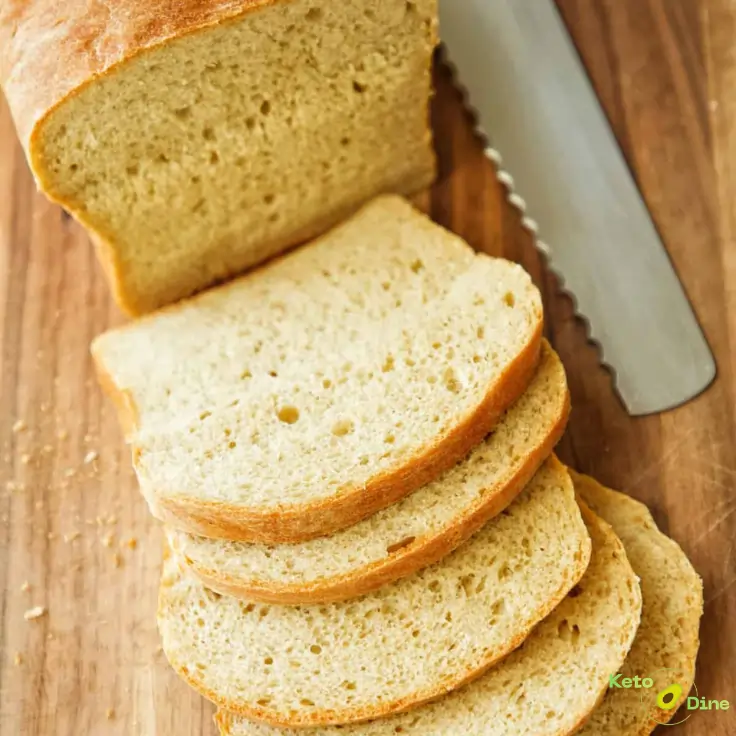
Baking a fresh loaf at home brings incredible comfort to any kitchen space. This particular recipe delivers a beautifully golden crust combined with a remarkably soft, pillowy interior. Meanwhile, the overall flavor profile remains delightfully neutral with subtle nutty undertones. As a result, this satisfying loaf serves as the perfect foundation for both savory avocado toast and sweet nut butter spreads.
Recipe Highlights
- Nutrient-Dense Base: Packs an impressive amount of plant-based protein into every single slice.
- Perfect Crumb Structure: Mimics traditional bakery loaves perfectly without using any animal products.
- Incredibly Versatile: Functions beautifully for morning toast, hearty lunch sandwiches, or simple table sides.
- Foolproof Method: Simplifies the standard baking process so beginners can achieve excellent results.
Why Make My High Protein Vegan Bread
- Ready quickly: Requires minimal hands-on effort throughout the entire mixing and proofing process.
- Great for meal prep: Slices cleanly and keeps its structural integrity well all week long.
- Beginner friendly: Eliminates complicated sourdough techniques so anyone can master it immediately.
- No fancy equipment: Needs only a standard mixing bowl, a loaf pan, and your hands.
- Budget friendly: Relies heavily on pantry staples rather than expensive specialty items.
- Family approved: Pleases everyone at the table with its classic, comforting texture.
Does High Protein Vegan Bread Fit a Keto Lifestyle?
This specific recipe fits remarkably well into a low-carb lifestyle due to its clever ingredient choices. By replacing standard white flour with plant protein isolates and seed meals, we significantly lower the total carb count. Consequently, the net carbs stay low enough to keep you comfortably tracking toward your daily macros. Therefore, you can confidently enjoy a thick slice without compromising your nutritional goals.
Why I Make This High Protein Vegan Bread on Repeat
I keep this reliable recipe in constant rotation because it solves my weekly breakfast dilemmas effortlessly. Preparing a fresh loaf on Sunday ensures that healthy, filling options remain available during busy mornings. Additionally, the satisfying chew keeps me energized throughout the afternoon. I truly love how beautifully it toasts up, developing a stunning golden color every time.
Why This High Protein Vegan Bread is Special
- Keto-friendly: Minimizes blood sugar spikes by keeping the impact carbs exceptionally low.
- High-protein: Sources its strength purely from clean, plant-derived protein components.
- Quick: Cuts down standard yeast waiting times through efficient rising steps.
- Comforting: Fills your entire home with that unmistakable, nostalgic bakery aroma.
- Meal-prep friendly: Freezes beautifully in pre-sliced portions for ultimate convenience later.
My Personal Experience
- Transformative Toasting: I noticed that this loaf crisps up far better than standard store-bought gluten-free varieties. The outer crust develops a delightful crunch while the inside stays beautifully tender.
- Sandwich Success: Packing this bread for outdoor lunches completely changed my midday routine. It never gets soggy or crumbles apart, even when piled high with fresh garden vegetables.
Perfect For
- Weeknights: Provides a swift, comforting side dish alongside warm, hearty winter soups.
- Meal prep: Simplifies your Sunday routine by securing your healthy carbohydrates for the week.
- Family dinners: Satisfies diverse dietary needs at the table without sacrificing classic bread textures.
- Lunches: Elevates the standard plant-based sandwich into a genuinely filling, macro-friendly meal.
Why You’ll Love This Recipe:
- Incredible Texture: Delivers a soft, bendable crumb that holds up perfectly under heavy sandwich toppings. You will never have to deal with dry, cardboard-like healthy bread substitutes again.
- Clean Ingredients: Focuses entirely on wholesome, recognizable components that naturally fuel your busy day. Furthermore, it completely avoids the weird artificial stabilizers found in commercial brands.
Key Ingredients
I’ve included everything below to make this recipe easy to follow at home. For the full printable recipe instructions and ingredient quantities, scroll to the Recipe card at the bottom of this post.
Vital Wheat Gluten. This provides the primary structure and massive protein boost. It creates the essential stretchy dough network that traps air bubbles effectively.
Pea Protein Isolate. This adds clean, unflavored plant protein directly into the flour mixture. It enhances the nutritional profile silently while keeping the texture light.
Active Dry Yeast. This serves as our essential leaven for a beautiful, natural rise. It creates those classic tiny pockets of air throughout the entire loaf.
Warm Water. This activates the yeast properly when maintained around 110°F. It hydrates the dry ingredients evenly to form a smooth, workable dough ball.
Olive Oil. This contributes a subtle richness and keeps the crumb incredibly moist. It extends the shelf life naturally so your slices stay fresh longer.
How to Make High Protein Vegan Bread
I’ve included everything below to make this recipe easy to follow at home. For the full printable recipe instructions and ingredient quantities, scroll to the Recipe card at the bottom of this post.
- Whisk the vital wheat gluten, pea protein, and yeast together in a large bowl.
- Pour the warm water and olive oil directly into the dry mixture steadily.
- Stir the ingredients firmly until a cohesive, sticky dough begins to form completely.
- Knead the dough vigorously on a clean surface for a full ten minutes.
- Shape the smooth dough into a neat log and place it inside.
- Cover the pan loosely and let it rise for exactly one hour.
- Bake at 375°F for thirty-five minutes until the top turns deeply golden brown.
- Cool completely on a wire rack before attempting to slice into pieces.
Pro Tip: Always let the loaf cool entirely for at least one hour before slicing. Cutting into hot bread lets essential steam escape, which can make the interior sticky.
Common Mistakes to Avoid
- Using Hot Water: Killing the yeast with water above 120°F prevents the dough from rising.
- Rushing the Cooling: Slicing the loaf too early creates a gummy, dense internal texture.
- Under-kneading the Dough: Skipping the full kneading time results in a flat, crumbly product.
Required Equipment
- Standard Loaf Pan: Shapes the dough perfectly into uniform, sliceable sandwich portions.
- Large Mixing Bowl: Houses the ingredients cleanly while allowing ample room for hand mixing.
- Wire Cooling Rack: Promotes optimal air circulation underneath the loaf to prevent sogginess.
Caleb’s Recipe Tips
- Boost the Flavor: Add a teaspoon of garlic powder to the dry mix for savory depth.
- Check the Water: Use a digital thermometer to ensure your water sits precisely at 110°F.
- Store it Right: Slice the entire loaf before freezing so you can grab single pieces easily.
- Enhance the Crust: Brush a tiny bit of melted vegan butter on top right after baking.
Storage Instructions
Keep your leftovers stored securely in an airtight container at room temperature for three days. Alternatively, move the container into the refrigerator to extend the freshness up to one week. For long-term storage, place the individual slices into freezer-safe bags for up to three months. When you are ready to enjoy, simply pop a frozen slice directly into your toaster.
High Protein Vegan Bread Recipe
Description
This homemade loaf combines simple plant-based ingredients to deliver a highly nutritious bread option. It bakes up beautifully with a classic texture that fits low-carb lifestyles. Enjoy a slice every morning to kickstart your day with clean protein power.
Ingredients
Instructions
-
Combine the wheat gluten, pea protein, yeast, and salt thoroughly in your bowl.
-
Add the warm water and olive oil to the dry base immediately.
-
Mix the contents firmly until the dough pulls away from the sides cleanly.
-
Knead the dough vigorously on a flat board for ten full minutes.
-
Place the shaped dough smoothly into a greased standard bread baking pan.
-
Allow the dough to rest undisturbed in a warm spot for one hour.
-
Pre-heat your conventional kitchen oven to exactly 375°F during the final minutes.
-
Bake the loaf steadily for 35 minutes until it sounds hollow when tapped.
Nutrition Facts
Servings: 10 ServingCalories:140kcalTotal Fat:3.5gSodium:240mgPotassium:95mgTotal Carbohydrate:5gDietary Fiber: 2gProtein:22gCalcium: 30mg
Note
Always use fresh yeast to ensure your loaf achieves its maximum height during proofing. If you notice the top browning too quickly, tent it loosely with aluminum foil. This recipe contains wheat gluten, so it is absolutely not suitable for celiac diets. Store your pre-sliced portions with pieces of parchment paper in between to prevent sticking.
Pin this recipe to share with your friends and followers.

Frequently Asked Questions
Can I use a bread machine for this recipe?
Yes, you can run it safely on the standard rapid bake cycle.
Why did my bread turn out dense?
You likely used water that was too hot and killed the yeast.
Can I substitute the vital wheat gluten?
No, this specific ingredient provides the structural foundation for the recipe.