
 View Gallery
1 photo
View Gallery
1 photo
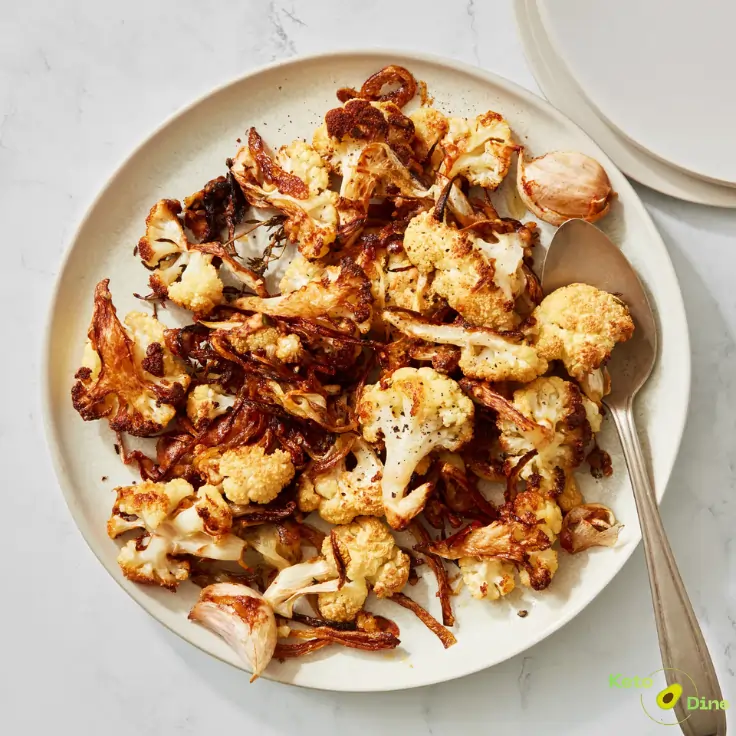
This crispy Parmesan-Roasted Cauliflower brings a deeply savory, nutty flavor right to your dinner table. Golden-brown florets offer a tender interior paired with satisfyingly crunchy, caramelized edges. You will absolutely love how easily this simple vegetable transforms into an addictive, low-carb side dish. It delivers a rich, comforting taste that naturally satisfies your cravings while aligning seamlessly with keto dietary goals.
Recipe Highlights
This recipe turns ordinary, mild cauliflower into a gourmet side dish using basic pantry staples. High-heat roasting caramelizes the natural sugars in the vegetable while creating an incredibly savory cheese crust. Consequently, the dish balances rich, earthy garlic notes with the sharp saltiness of real aged cheese.
Why Make My Parmesan-Roasted Cauliflower
- Ready quickly: You can prep this simple dish and have it baking in under ten minutes.
- Great for meal prep: The roasted florets maintain excellent texture and reheat beautifully for weekday lunches.
- Beginner friendly: Simple, straightforward steps make it completely foolproof for home cooks of any skill level.
- No fancy equipment: All you need is a standard sheet pan and a sharp chef’s knife.
- Budget friendly: It utilizes accessible, inexpensive everyday ingredients available at any local grocery store.
- Family approved: Even picky eaters love the crispy, chip-like texture of the baked cheese edges.
Does Parmesan-Roasted Cauliflower Fit a Keto Lifestyle?
This dish fits perfectly into a low-carb lifestyle. Cauliflower naturally contains very few net carbs, making it an ideal vegetable base. Additionally, real cheese and healthy cooking oils provide the quality fats required for ketosis. Therefore, you can confidently enjoy generous portions without worrying about hidden carbohydrates.
Why I Make This Parmesan-Roasted Cauliflower on Repeat
I cook this vegetable side dish constantly because it pairs effortlessly with almost any main course. It requires virtually zero hands-on effort once it goes into the hot oven. Furthermore, the combination of garlic and melted cheese satisfies my cravings for savory comfort food. It remains my absolute favorite way to meal prep healthy vegetables for the busy week ahead.
Why This Recipe is Special
- Keto-friendly: Naturally low in carbohydrates to support your health journey seamlessly.
- Quick: Minimal kitchen prep time keeps your evening moving smoothly.
- Comforting: Warm, roasty aromas fill your kitchen with cozy restaurant vibes.
- Meal-prep friendly: Tastes incredible the next day when tossed cold into fresh salads.
- Beginner friendly: Uses simple cooking techniques that build kitchen confidence instantly.
My Personal Experience
- I discovered that tossing the ingredients directly on the baking sheet saves me from washing extra bowls.
- Leaving the garlic cloves in their skins while roasting keeps them sweet, jammy, and completely prevents burning.
Perfect For
- Weeknights: Quick cleanup makes it ideal for hectic Monday evenings.
- Meal prep: Portion it out alongside your favorite proteins for healthy weekday lunches.
- Family dinners: A crowd-pleasing side dish that complements roasted chicken or grilled steaks beautifully.
- Holidays: Elevated presentation makes it elegant enough for your festive Thanksgiving or Christmas table.
- Parties: Serve it warm on a platter as an easy, low-carb appetizer for guests.
- Lunches: Mix the leftovers with grilled chicken breast for a fast, satisfying midday meal.
Why You’ll Love This Recipe
- Texture contrast: You get a wonderful combination of tender vegetable centers and crispy, lacy cheese edges.
- Deeply savory flavor: Umami-rich cheese and warm garlic create an irresistible taste profile that elevates the cauliflower.
Variations You Can Try
- Spicy: Toss the florets with half a teaspoon of red pepper flakes before roasting for a fiery kick.
- Extra cheesy: Sprinkle shredded cheddar or asiago over the pan during the final five minutes of baking.
- Dairy-free: Substitute nutritional yeast for the grated cheese to achieve a similar nutty, savory flavor profile.
- Vegetarian: This classic preparation is already completely vegetarian-friendly as long as your cheese uses microbial rennet.
- Air fryer: Cook the seasoned florets at 390°F for twelve minutes, shaking the basket halfway through.
- Oven: Utilize a heavy-rimmed baking sheet on the center rack for optimum heat distribution and maximum browning.
- Meal prep: Spread the vegetable out across two sheets to prevent crowding, ensuring every single piece gets crispy.
Key Ingredients
I’ve included everything below to make this recipe easy to follow at home. For the full printable recipe instructions and ingredient quantities, scroll to the Recipe card at the bottom of this post.
- Cauliflower: The mild-tasting, sturdy foundation. It acts like a sponge, soaking up the savory garlic oil and browning beautifully.
- Olive Oil: A rich, high-quality cooking fat. It coats the florets to ensure even heat distribution and promotes a golden, crispy exterior.
- Garlic: Fresh unpeeled cloves. They roast into sweet, buttery pockets of flavor that complement the sharp cheese notes.
- Parmesan: Finely grated aged cheese. It creates a crisp, salty crust that clings to each vegetable piece for ultimate flavor.
Ingredients & Substitutions
- Cauliflower: The central element of this low-carb dish. You can use broccoli florets instead, though the cooking time may decrease slightly.
- Olive Oil: Essential for roasting and developing color. Avocado oil makes an excellent alternative due to its high smoke point.
- Garlic Cloves: Provides a sweet, aromatic undertone. Do not substitute with garlic powder if you want those jammy, whole-roasted garlic pockets.
- Parmesan Cheese: Delivers a sharp, salty punch. Pecorino Romano works beautifully as a direct substitute, though it adds a tangier flavor profile.
How to Make Parmesan-Roasted Cauliflower
I’ve included everything below to make this recipe easy to follow at home. For the full printable recipe instructions and ingredient quantities, scroll to the Recipe card at the bottom of this post.
- Preheat your oven to 420°F and grease a large, rimmed baking sheet thoroughly.
- Cut the vegetable head into uniform, bite-sized florets to ensure they cook at the exact same rate.
- Spread the pieces across the pan, then scatter the unpeeled garlic cloves evenly between them.
- Drizzle olive oil over the top, tossing well until every edge is lightly coated.
- Season with salt and black pepper, then spread everything into a single, un-crowded layer.
- Roast for fifteen minutes until the undersides begin to turn a light golden color.
- Sprinkle the finely grated cheese evenly over the vegetables, turning them gently with a spatula.
- Bake for another ten minutes until the cheese forms a deeply browned, crispy lace crust.
Pro Tip: Ensure your cauliflower is completely dry after washing, as excess moisture will steam the vegetable instead of roasting it.
Common Mistakes to Avoid
- Crowding the pan: Piling florets on top of each other traps steam, resulting in a mushy texture.
- Using pre-shredded cheese: Cellulose coatings on packaged cheese prevent it from melting into a crispy, delicate crust.
- Peeling the garlic early: Exposed garlic burns easily in a hot oven, creating a bitter, unpleasant taste.
- Cutting uneven sizes: Small pieces will burn to a crisp before the larger florets become tender.
Required Equipment
- Rimmed Baking Sheet: Provides a wide surface area that allows heat to circulate freely around the vegetables.
- Chef’s Knife: Allows you to slice cleanly through the dense core of the vegetable safely and efficiently.
- Spatula: Helps you flip the delicate, cheesy florets without breaking apart the crispy crust.
Caleb’s Recipe Tips
- Slice your florets to feature at least one flat side, maximize contact with the pan for extra browning.
- Save the tender inner leaves of the vegetable and roast them right along with the florets.
- Grate your cheese using a microplane to create a fine powder that sticks effortlessly to the oil.
- Add a tiny pinch of smoked paprika to the seasoning mix for a subtle, fireside undertone.
Pro Tips for Best Results
- Position your baking pan on the bottom oven rack to maximize bottom-up searing heat.
- Allow the pan to rest for two minutes out of the oven so the cheese firms up before moving.
- Keep the garlic skins on during roasting to seal in moisture, then squeeze the jammy cloves out before serving.
- Toss the hot, roasted florets with fresh lemon zest right before serving to cut through the rich cheese.
- Use a heavy, dark metal sheet pan because it conducts heat much faster than thin aluminum sheets.
Storage Instructions
- Refrigerator storage: Keep leftovers in an airtight glass container for up to four days.
- Freezer storage: Freezing is not recommended, as the vegetable loses its signature crispness upon thawing.
- Reheating tips: Warm the florets in a hot skillet or air fryer at 350°F to restore the crunchy texture.
Serving Ideas
- Side dish: Serve alongside a juicy, seared ribeye steak or crispy pan-fried chicken thighs.
- Sauce pairing: Dip the warm, crispy pieces into a creamy garlic aioli or zesty pesto.
- Garnish: Top with chopped fresh parsley or a drizzle of aged balsamic vinegar for enhanced presentation.
- Family meals: Present it in a large ceramic bowl right in the center of the dinner table.
- Meal prep bowl: Layer it over a bed of spinach with grilled chicken and a dollop of feta dip.
Easy Parmesan-Roasted Cauliflower Recipe (Keto & Low Carb)
Description
This easy sheet-pan side dish features tender cauliflower florets roasted at high heat with savory olive oil and whole garlic. Finely grated cheese creates an incredibly crispy, golden crust during the final minutes of baking. It serves as the perfect low-carb, keto-friendly accompaniment to any weeknight protein.
Ingredients
Instructions
-
Preheat your oven to 420°F and lightly oil a large, rimmed baking sheet.
-
Arrange the cut florets and whole, unpeeled garlic cloves in a single layer across the pan.
-
Drizzle olive oil over everything, then toss thoroughly to ensure even, complete coverage.
-
Season evenly with sea salt and coarse black pepper, ensuring the flat edges face downward.
-
Bake for 15 minutes at 420°F until the bottoms begin to develop a golden color.
-
Remove the pan briefly, turn the florets with a spatula, and sprinkle the cheese over them.
-
Return to the oven for 10 minutes until a crispy, browned cheese crust forms completely.
-
Let cool for two minutes, then squeeze the sweet garlic out of its skin over the florets before serving.
Nutrition Facts
Servings: 4 ServingCalories:145kcalTotal Fat:12gCholesterol:10mgSodium:380mgPotassium:320mgTotal Carbohydrate:6gDietary Fiber: 2.5gSugars: 2gProtein:5gCalcium: 140mg
Note
Store leftovers in a shallow glass container to prevent the cheese crust from becoming soggy.
Reheat exclusively in an air fryer or oven; microwave reheating will make the vegetable soft.
This dish is naturally gluten-free and nut-free, making it safe for common household allergies.
Pin this recipe to share with your friends and followers.

Frequently Asked Questions
Can I use frozen cauliflower for this recipe?
Fresh cauliflower works best because frozen varieties contain too much moisture to get truly crispy.
How do I prevent the cheese from burning?
Add the grated cheese during the last ten minutes of baking rather than at the start.
Do I need to peel the garlic first?
Leave the skins on to protect the cloves from the intense heat so they stay sweet.